VOIspeed INTEGRATION GUIDE
Introduction
The VOIspeed multimedia telephone platform has powerful and flexible integration tools that allow the realization of many functions and needs that would otherwise not be obtainable with the simple configuration of the PBX.
Throughout this guide, we will explain the basic concepts of VOIspeed platform architecture and how it operates, which is paramount to your understanding the development tools available to you.
We will continue with the analysis of the various integration tools available and how they are configured to be immediately operational. At the same time in this section, we shall write our first applications “hello world”, one for each type of integration.
We shallo list all the services and events available, describing their parameters and their meaning.
The last part of the guide will focus on three very common integration scenarios in the business environment that we shall analyse and partially implement:
- We shall make telephone bar within a mini CRM, from which we will be able to create calls, put them on hold and retrieve them, break them down and view their contact cards at the same time.
- We shall make a simple predictive dialer which is a widely-used tool in the call centre environment. Our example application will take a large number of numbers as input. These numbers will be called automatically, and at when answered, the external interlocutor will be put in communication with an operator of the call centre itself.
- In this scenario, through the PIN request by the IVR, we will authenticate the caller and then forward it to the operator most suitable for processing the call.
VOIspeed Architecture
System entity
The SYSTEM
ENTITIES are the constitutive elements of the VOIspeed platform that interact with each other giving rise to calls and other forms
of interconnection (Fig. 1.1).

Figure 1.1
System entities derive from a superclass that defines their usage interface. They are divided into categories, each of which defines a typical behavior for the same category that can be activated through the common interface (Fig. 1.2).
Figure 1.2
Each entity is defined by an identifier (ID), unique within its category, and by the category itself (TYPE).
Table 1 lists all entity types and their values.
System entities are divided into atomic entities and compound entities .
The entities composed , in addition to implement the behavior defined by the category they belong, contain within them other atomic entity or compound in turn.
A good example of a composite entity is the ring group which contains N users inside
The users themselves are compound entities since they include the M terminals (DEVICE) associated with them (see figure 1.3).
Figure 1.3
Configuration
All system entities can be added, updated and deleted from the WEB configurator. In particular:
Each system entity can be configured according to the provisions of its category to which it belongs.
The configuration of a ring group, for example, concerns how many and which users must ring when a call arrives for the group, for how long, in what order and what actions must be performed in case of failure.
The configuration of an IVR allows you to establish the tree of nodes to cross, with which input you go from one node to another, which message must be played on each node and which actions must be performed by the nodes themselves.
In general, the configuration of entities gives them a “static” behavior when they are involved in a call. This behavior remains unchanged until the next configuration change.
Routing rules
When a call arrives, the routing rules determine which system entities will play the role of caller and callee for the call. This routing depends on the number called, the time of arrival of the call and the calling number.
The integration tools, allow you to obtain dynamic call flows (as far as possible) otherwise unobtainable with only the configuration of entities and routing rules.
Switching
Switching is the controller of an audio video call
running on the PBX, in which two system entities are involved
performing the roles of caller and called (Fig. 1.4).
Switching receives events from the calling entity, processes them and eventually sends commands to the called entity and vice versa.
Figure 1.4
Each system entity manages N calls, each of which refers to its own call controller (switch).
Figure 1.5 shows Entity B having two calls in progress:
- call B1 with entity A controlled by switching 1
- call B2 with entity C controlled by switching 2
Figure 1.5
The calls A1, B1, B2, and C1 are called "entity calls" and are identified in turn by a unique "entity_call_id" and generated when the calls are created.
If we compare any call to a play
- The system entities are the actors who play the score assigned to them through the configuration.
- The call controller, ie the switching , is the director who coordinates the script using events and commands from the common interface of the two entities involved.
- The script is the execution of a finite state machine where the transition from one state to another is determined by the call events received by the entities involved and by the reports sent to them.
The
“status" property represents the state in which the switching itself is found and assumes values in accordance with the following diagram (Fig 1.6).
Figure 1.6
Integration tools
In this chapter we will list the VOIspeed platform integration tools and how to configure them to be used in your applications.
VOIspeed provides three levels of integration tools (Fig.2.1):
- user level interface
- extended or system level interface
- IVR level interface
Figure 2.1
Http \ https protocol
Each integration level communicates with the outside world
through a services and events interface via
http \ https protocol .
Each level of integration is centered on the telephone business of a specific sector of the VOIspeed platform.
The user level , for example, is focused on the activity of the system extensions
The IVR level , on the other hand, is tuned to the activity of one or more automatic responders.
The extended interface, finally, notification events and provides services for all entities of VOIspeed platform from a more general perspective (extended).
Each type of interface has been designed for certain integration scenarios which we will describe in detail below.
User and extended interface configuration
In this paragraph we will see which configurations are necessary to enable integration at user level and \ or extended level.
- From the Configuration menu select the Company item
- In the Integration section, click the Add Integration button
- In the popup window of Figure 2.2:
- Enter the Name of the integration and Enable it.
- In the drop-down menu Integration module choose Generic.
- In the SSN Events section, select the extended events of your interest.
- In the User Events section, select the user events of your interest.
- In the Users section, select all extensions for which you wish to be notified
- If, in addition to receiving events, you wish to use the PBX services, select the Enabled commands option. Please Note by enabling the commands, the system will generate a
" token password" on your behalf that you will have to insert in all service requests and which will allow the system to quickly recognize and authenticate your application.
- Click on the OK button and your application will be saved and will be visible in the list of integrations.
- At the end of the line corresponding to your application you will find a series of icons
- Configure icon. Clicking on this icon opens a popup window in which you will have to enter your URL for notifications , that is the HTTP URL that the PBX will invoke to notify you of the events you have configured in the previous points. The parameters that will carry the information associated with the event itself will be added to the URL you indicate
- Icon shows details . Clicking on this icon will show the details of your application; we mention two important ones:
- The password token to be included in all service requests sent by your application
- The integration URL that is the URL to which you must send your service requests
- Edit icon. Clicking on this icon opens the configuration interface of your integration module where you can modify events and users of your interest and all other information relating to the module itself
- Delete icon.By clicking on this icon you are asked to confirm the deletion of your module.
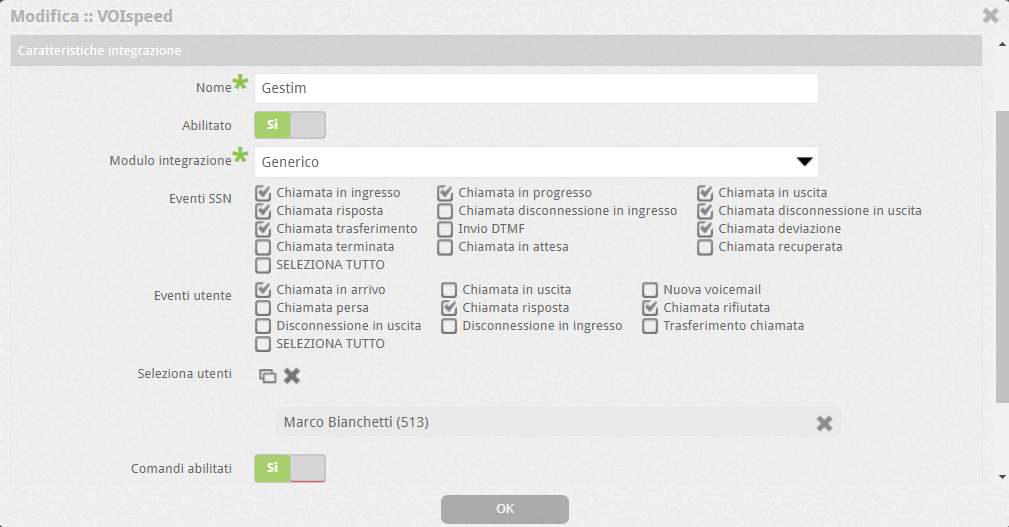
Figure 2.2
Hello world
Now that we've set up our first integration, let's try everything out and write our first “ Hello world ” application
Actually our “Hello world” will not require any coding; in fact, using our browser, we will send the command call_request to create a call between extension 35 and external number 187
Please Note. Before starting, let's make sure that, in your PBX, there is an extension “35”, that this extension has at least one SIP terminal associated with it, and that there is at least one gateway and / or carrier voip that allows us to make calls on the public network.
- Go to Configuration \ Company \ Integrations and edit your previously created integration
- For now, deselect all SSN events
- Select all user events
- Select the "35" among the interiors
- Enable the commands and make a note of the
token password associated with your application
- Save your changes
- Open the detail view of your integration module and take note of the integration url; suppose it is seri1.cluana.com/PBX/seri_endpoint.php
- Open your browser and enter the following URL
http://seri1.cluana.com/PBX/seri_endpoint.php?service=call_request&token=vostro_token&ext=35&number=187
If all the prerequisites are met and you have carried out everything described to the letter, you should see the birth of the call between extension 35 and number 187.
Congratulations! You gave your first call command to the PBX through the integration module you created and configured yourself.
In the following chapters we will analyse all the user and extended services describing the relative parameters for each one, and illustrate this now with the example of the one just launched.
- seri1.cluana.com/PBX/seri_endpoint.phpis the interface for the integrated services which you must always contact (SERI).
- The service parameter specifies the requested service
- The token parameter is your password to access the integrated services
Now let's analyse what your browser shows when the command is finished
<?xml version="1.0" encoding="UTF-8" ?>
<result>
<outcome>0</outcome>
<request_id>15652770917203</request_id>
</result>
Reply
All service requests generate an XML response encapsulated in the result tag within which you find the outcome tag whose value indicates the success or failure of the command.
<outcome>0</outcome> indicates that the command was sent successfully, ie it was taken over by the PBX.- The tag
<request_id>15652770917203</request_id> contains the identifier of the request.
In case of command failure the response obtained will be of this type:
<?xml version="1.0" encoding="UTF-8" ?>
<result>
<outcome>1</outcome>
<error>connection not found</error></result>
- The tag
<outcome>1</outcome> indicates failure.
- The tag
<error> contains the cause of the failure.
Event Logger
Now we will implement a very simple "Logger" of events on file in order to check how many and which events arrive in relation to a user call.
Before writing code for our application, we must indicate to the VOIspeed platform where we want to receive events. To do this, simply click on the Configure icon of your integration module and enter the URL for notifications (eg http: //my_server/logger.php ).
Once the configuration is done, create the “logger.php” file , copy the following code, save it and in your web server.
<?php
	$params=$_SERVER['QUERY_STRING'];
	$file_handle = fopen('logger.txt','a');
	fwrite($file_handle,date(DATE_RSS).' '.$params."\r\n");
	fclose($file_handle);
?>
We have simply written in the file the date_time of arrival of the event and the query string of the event itself.
At this point, go back to your browser and run the Hello World application call_request command again ; as before, you should see a call originate from the SIP terminal of extension “35” to number 187, listen to the audio from the terminal for a few seconds and then end the call from the terminal itself.
Now go to your WEB server and open the file "logger.txt" and if everything went smoothly, you should find three events all related to "35":
- event_type=2&event=9&event_name=outgoing_call&ext=35
- event_type=2&event=14&event_name=call_answered&ext=35
- event_type=2&event=16&event_name=call_disconnect_out&ext=35
In the recorded events there are other parameters which we will discuss later, but now we will focus on those shown above.
- event_type indicates whether it is a user or extended event
- 1 = extended event (SSN)
- 2= user event
- event event code of the event
- event_name is the name of the event
- ext indicates the extension to which the event refers
The event 9 “outgoing_call” indicates that the user "35" called the number 187, present in the parameter "number" do not appear.
The event 14 “call_answered” indicates that the call to 187 was accepted by 187 itself.
The event 16 “call_disconnect_out” indicates that the interior "35" has ended the call.
In summary
- You have issued a call_request command with which you have created a call between extension "35" and number "187"
- You have received call-related events informing you of the status of the call.
User integration
In this section we will focus on the user level which, as we have already seen in the previous chapter, has services and events that we will list and analyse one by one.
We will understand which services to use to make a call, put it on hold and reactivate it, forward it and end it. We will also understand how to retrieve call information from user events, and then use them as call service parameters.
The service requests, as we saw in the small “Hello world” example , are “HTTP GETs” that get an XML response containing the “outcome” tag .
<?xml version="1.0" encoding="UTF-8" ?>
<result>
    <outcome>1</outcome>
    <error> error description </error>
</result>
The tag <outcome> 1 </outcome indicates that the service request was rejected and the tag <error> contains the reason for the failure.
<?xml version="1.0" encoding="UTF-8" ?>
<result>
    <outcome>0</outcome>
    <request_id> 56732980 </request_id>
</result>
The tag <outcome> 0 </outcome, however does not mean that the command was executed successfully, but that the system has received the request that will be executed at a later time.
The execution of the requested services is asynchronous , ie the request is examined and in case of validation a request_id is returned ..
At the time of the actual execution of the request, in case of failure, the sender will be notified of the "command failed" event containing the request_id parameter, whose value is the one returned at the time of the request.
User services
| Service |
Description |
| call_request |
make a call |
| call_action |
performs an action on a call |
| set_user_mode |
set user mode |
| get_user_call_report |
requests the user call report |
The service parameter must be included in all service requests to
identify the service to be provided
Furthermore
The token parameter must be included in all requests to service for the identification and authentication of the sender
Service “call_request”
Description
Allows you to make a call from a user, specified by the "ext" parameter, to a number, specified by the "number" parameter. It is also possible to specify with which terminal to make the call and an external identification which will then be inserted in all notifications concerning the call itself.
Parameters :
- service=call_request [required ]
- token [required] identification password
- ext [required] indicates the extension that intends to make the call
- number [required] indicates the number to call
- extid [optional] external identifier
- device [optional - default=sip]indicates which user terminal to make the call with. The possible values are:
- sip: specifies that you want to use the first currently registered SIP terminal
- mobile: indicates that you want to use the mobile phone of the extension
- id terminale: as an alternative to the previous options, you can specify a terminal identifier if you know it
Result
<result>
    <outcome>0 = Ok \ 1 = KO </outcome>
    <request_id> service request id </request_id>
</result>
Examples
URL?service=call_request&token=mio_token&ext=35&number=187&device=mobile
Service “call_action”
Description
Allows you to perform an action on an existing call, as long as you know its identification.
The integrator can learn the call sign by intercepting user call event notifications.
Parameters :
- service=call_action [required]
- token [required] identification password
- ext [required] indicates the extension performing the action
- call_id[required] is the " entity_call_id " that is the id of the user call on which to perform the action
- action [required] indicates what action should be performed on the call. The possible values are:
- disconnect: ends the call
- hold - puts the call on hold
- retrieve: reactivate the call on hold
- accept: accept the incoming call for the user
- rec_start; activate call recording
- rec_stop: ends call recording
- switch : terminal change during a call
- divert: unsupervised call transfer
- transfer : supervised call transfer
- number - [required for action=divert] indicates the number to forward the call to
- note- [optional for action=divert] notes of the user making the call
- device - [required for action=switch] specifies the terminal
- recipient_call_id - [required for action=transfer] id of the call to which you want to transfer the current call (call_id).
Result
<result>
    <outcome>0 = Ok \ 1 = KO </outcome>
    <request_id> id richiesta service  </request_id>
</result>
Divert Example
URL?service=call_action&token=567897655&ext=35&call_id=3250&action=divert&number=39¬e=mia_nota
Disconnect example
URL?service=call_action&token=567897655&ext=35&call_id=3250&action=disconnect
Service “set_user_mode”
Description
Sets user mode for normal, do not disturb, away and divert.
Parameters :
- service=set_user_mode [required]
- token [required] identification password
- ext [required] extension for which you want to set the mode
- mode[required] mode to set
- 0 = available
- 1 = do not disturb
- 2 = absent
Result
<result>
    <outcome>0 = Ok \ 1 = KO </outcome>
    <request_id> service request id </request_id>
</result>
Example set_user_mode
Set do not disturb mode
URL?service=call_action&token=567897655&ext=35&mode=2
Service “get_user_call_report”
Description
Retrieves the history of calls relating to a user of the system, which
respond to a series of requirements specified by the parameters entered in the request.
The history will be returned in XML format and each call will be placed in a tag <call>..</call>.
Parameters :
- service=get_user_call_report [required]
- token [required] identification password
- ext [required] extension for which the call history is retrieved
- date_from[optional] lower bound for the date of the call history
- if omitted: all calls with no lower date limit
- format: Y-m-d 00:00:00
- date_to[optional] upper limit for the date of the call history
- if omitted: all calls with no upper date limit
- format: Y-m-d 00:00:00
- limit[optional] maximum number of calls returned
- offset[optional] call number to start a new search from
- callid[optional] call id -
- if omitted, all calls are recovered
- direction[optional] direction of the call
- if omitted all call directions
- in: calls received by the user
- out: calls made by the user
- number number of the user's interlocutor
- outcome call outcome (Table 8 )
Result failed
<result>
    <outcome1</outcome>
    <error> failure reason </error>
</result>
Result successful
<result>
	<outcome>0 </outcome>
    <call>
	    <id> autoincrement
	    <callid> Id communication
	    <start_time> call start time
	    <answer_time> Call answered time
	    <duration> duration in seconds
        <outcome> outcome (Appendices\Table 8)
	    ..
	    <direction> direction of the call
	    <my_number> extension of the user
	    <remote_number> interlocutor number
	    <local_id> entity_call_id
	    <group_name>membership group name
	    ...
	    <company>company contact for "my_number"
	    <surname>contact surname for "my_number"
	    <name>name contact per “my_number”
	    <remote_company>contact company for "remote_number"
	    <remote_surname>contact surname for "my_number"
	    <remote_name> name contact per “my_number”
    <call>
</result>
User events
In the Integration tools chapter we saw how to configure an integration module, in which you specified:
- user events of interest to you
- the users you want to monitor
- your notification URL
If you have configured everything correctly, upon the occurrence of the events you have selected relating to the users of your interest, you will receive "notifications" at the URL you have indicated.
All user events will always contain the following parameters:
- eventtype: a value of 2 indicates that this is a user event
- event: event code (see events table)
- event_name: event name (see events table)
- token: the token associated with your integration module
- domain: the name of the VOIspeed domain to which the event refers
- license_id: VOIspeed installation license
- ext: the extension the event refers to
| Event |
Code |
Description |
| cmd_failed |
1 |
Command failed |
| incoming_call |
8 |
Incoming call to the user |
| outgoing_call |
9 |
Call made by the user |
| new_voicemail |
10 |
New voice message for the user |
| lost_call |
12 |
New missed call for the user |
| call_answered |
14 |
Call answered |
| call_rejected |
15 |
Call rejected |
| call_disconnect_out |
16 |
Call terminated by the user |
| call_disconnect_in |
17 |
Call termination received |
| call_transfer |
18 |
Call transferred |
Please note
the “call_transfer” event (code 18) has not yet been implemented.p>
Event “cmd_failed”
Code : 1
Description
Let's suppose that you have made a service request related to a certain user and that the user services interface has validated it and returned the “request_id”.
If, during the execution of the request, any problem arises that makes it impossible to provide the service, the "cmd_failed" event is notified
Parameters
- request_id: id of the failed request
- command: command name failed
- command_id: command code failed
- call_id: id of the user call to which the service request was related
- number: number to call (only for the "call_request" service)
Event “incoming_call”
Code: 8
Description
This event notifies the arrival of a call for the extension “ext” by the “number”.
Parameters
- ext: extension that is receiving the call
- datetime: date and time of arrival of the call
- usercallid: id of the user call (to be used in the "call_action" service)
- callid: id of the switch
- number: number from which the call comes
- group: any group to which the extension "ext" belongs
- name: name of the contact associated with "number"
- surname: surname of the contact associated with "number"
- company: company of the contact associated with "number"
- external_contact_id: id of the contact of your address book
Event “outgoing_call”
Code: 9
Description
This event notifies that the extension "ext" is calling the number "number".
Parameters
- ext: extension that is making the call
- datetime: date and time of call start
- usercallid:id of the user call (to be used in the "call_action" service)
- callid: id of the switch
- number: number called
- name:name of the contact associated with "number"
- surname: surname of the contact associated with "number"
- company: company of the contact associated with "number"
- extid: external call id, entered by you in the "call_request" service
- external_contact_id: id of the contact of your address book
Event “new_voicemail”
Code: 10
Description
This event is notified when there is a new voicemail message in a user's voicemail.
Parameters
- file: name of the file for the new voice message
- start_time: date and time of the start of the message
- end_time: date and time of the end of the message
- number: number of the person who left the message
- name: name of the person who left the message
- surname: surname of the person who left the message
- company: company and / or department of the person who left the message
Event “lost_call”
Code: 12
Description
This event is raised when there is a new missed (unanswered) call for a user.
Parameters
- ext: extension that has a new missed call
- number: calling number
- name: name of the contact associated with the calling number
- surname: surname of the contact associated with the calling number
- company: company of the contact associated with the calling number
- callid: id of the switch
- usercallid: id of the user call (entity_call_id)
Event “call_answered”
Code: 14
Description
This event notifies that the call between the extension “ext” and the number “number” has been accepted by one of the two depending on the direction of the call. In general, this event indicates that the call has transited into its “active state”, ie the extension “ext” and the number “number” are talking. If you are interested in knowing who did what then you should keep track of the call and save the direction of the call, through the incoming_call and outgoing_call events described above.
Parameters
- ext: extension to which the event refers
- datetime: date and time of the response
- usercallid: id of the user call (to be used in the "call_action" service)
- callid: id of the switch
- number: interlocutor of the “ext” extension in the call
- name:name of the contact associated with "number"
- surname: surname of the contact associated with "number"
- company: company of the contact associated with "number"
- external_contact_id: id of the contact of your address book
Event “call_rejected”
Code: 15
Description
This event notifies that the call between the extension "ext" and the number "number" has been rejected by the "called" whoever it is. In general, this event indicates that the call between the extension “ext” and the number “number” has “ended” without the two having spoken. If you are interested in knowing who was the caller and who was called and consequently who refused then you should keep track of the call and save the direction of the same, through the incoming_call and outgoing_call events described above.
Parameters
- ext: extension to which the event refers
- datetime: date and time of the response
- usercallid: id of the user call (to be used in the "call_action" service)
- callid: id of the switch
- number: interlocutor of the “ext” extension in the call
- name:name of the contact associated with "number"
- surname: surname of the contact associated with "number"
- company: company of the contact associated with "number"
- external_contact_id: id of the contact of your address book
Event “call_disconnect_out”
Code: 16
Description
This event notifies that the extension "ext" has closed the call with the "number" after speaking to us.
Parameters
- ext: extension that ended the call
- datetime: date and time of disconnection
- usercallid: id of the user call
- callid: id of the switch
- number: interlocutor of the “ext” extension in the call
- name:name of the contact associated with "number"
- surname: surname of the contact associated with "number"
- company: company of the contact associated with "number"
- external_contact_id: id of the contact of your address book
Event “call_disconnect_in”
Code: 17
Description
This event notifies that the extension "ext" has suffered the closure of the call from the number "number" after talking to it.
Parameters
- ext: extension that received the call termination
- datetime: date and time of disconnection
- usercallid: id of the user call
- callid: id of the switch
- number: the number that ended the call with the extension "ext"
- name:name of the contact associated with "number"
- surname: surname of the contact associated with "number"
- company: company of the contact associated with "number"
- external_contact_id: id of the contact of your address book
Extended Integration
In this section we will analyse the “extended” development interface which, like the user interface, has services and events that we will list and analyse one by one.
If the Integration user interface puts the user entity at the centre of its activity, the extended interface goes beyond the concept of the user to involve all the system entities.
In fact, the extended Integration interface allows generic operations such as:
- Get the list of system entities
- Manage company phone book
- Get call report
- Get the list of ongoing calls
It also provides commands for extended call management:
- creates a call between two system entities (call_request_ext)
- puts an entity involved in a call in communication with a second entity involved in another call, disconnecting the respective interlocutors (call_transfer_ext)
- replaces an entity involved in a call with another entity (call_divert_ext)
- activate the recording of an ongoing call (call_recording_ext)
- stops an existing call(call_terminate)
Extended services
| Service |
Description |
| get_entities |
list entity |
| get_call_report |
call reports |
| get_current_calls |
list of ongoing calls |
| add_phonebook |
add a contact to the phonebook |
| update_phonebook |
update a contact in the phonebook |
| delete_phonebook |
delete a contact from the phonebook |
| get_phonebook |
list contacts from the phonebook |
| call_request_ext |
create a call between two entities |
| call_transfer_ext |
forwarding with extended supervision |
| call_divert_ext |
call extended diversion |
| call_recording_ext |
activate call recording |
| call_terminate |
end call |
The service parametermust be included in all service requests for the identification of the service to be provided
In addition:
The token parameter must be included in all service requests for the sender's identification and authentication
Service “get_entities”
Description
Returns a list of entities specified by the entity_type and entity_id parameters.
The returned list is in XML format and the tags present are a function of the type of entity requested.
Parameters:
- service=get_entities (required)
- token: (required) password identification
- entity_type: (required) specifies the type of entity required (Table 1)
- entity_sub_type: (optional) it only makes sense if entity_type = gateway and specifies the required gateway type (Table 3)
- entity_id: (optional) if omitted, the list of entities will be returned “entity_type”
- owner_id: (optional) identification of the owner of the requested entity
- se entity_type=7 (terminal) indicates the ID of the user for which the list of terminals is being requested
- se entity_type=8 (company voicemail) indicates the ID of the user responsible for the voicemail
Result per entity_type=0 - User
Returns N tag ‘user’ within the tag containing ‘users’, with each user tag contains the information fields of the user entity:
 <result>
    <outcome>0</outcome>
	<users>
	        <user>
	    	    <id> User ID </id>
	    	    <name> name</name>
	    	    <surname> surname</surname>
	    	    <extension> extension </extension>
	    	    <email> email address </email>
	    	    <chat_status>(Appendices\Table 2)</chat_status>
	    	    <av_status>(Appendices\Table 2)</av_status>
	    	    <numoffice> office number</numoffice>
	    	    <numhome> home number </numhome>
	    	    <nummobile> mobile number </nummobile>
	    	    <numfax> fax number </numfax>
	    	    <phrase> User status description </phrase>
	        </user>
	</users>
 </result>
Result for entity_type = 1 - Ring group
Returns N tag ‘group’within the'groups' container tag.
Each tag ‘group’ contains the group information fields and the tag ‘users’ which in turn contains M tag ‘user’ (members of the ring group):
<result>
   <outcome>0</outcome>
   <groups>
       <group>
   	    <id> id group_1name </id>
   	    <name> group_1 name </name>
   	    <is_broadcast> group by announcement </is_broadcast>
   	    <visible> visible in the UI </visible>
   	    <member_login> run time login off/on </member_login>
   	    <pick_disabled> pick up disabled call</pick_disabled>
   	    <ring_mode> Ring mode (Appendices\Table 10)</ring_mode>
   	    <users>
	   	    <user>
		   	    <id> id User_1 </id>
		   	    <identity> identità User_1 </identity>
		   	    <extension>i nterno User_1 </extension>
	   	    </user>
	   	    ...
		    <user>
		   	    <id> id User_M </id>
		   	    <identity> identità User_M </identity>
		   	    <extension>interno User_M </extension>
	   	    </user>
   	    </users>
       </group>
       ....
       <group>
	   <id> id group_N </id>
   	   <name> name group_N </name>
   	   ....
       </group>
</groups>
</result>
Result by entity_type=2 - Gateway
Returns N tag ‘gateway’ within the 'gateways’ tag container
Each tag ‘gateway’ contains the gateway information fields:
<result>
   <outcome>0</outcome>
   <gateways>
       <gateway>
   	    <id> gateway id _1 </id>
   	    <name> gateway_name 1 </name>
   	    <type> gateway_type 1 (Appendices\Table 3) </type>
   	    <enabled> enabled </enabled>
   	    <link_status> recording status (Appendices\Table 4)</link_status>
   	    <lines> number total lines </lines>
   	    <busy_lines> number lines busy</busy_lines>
   	    <host_port> IP and gateway port_1</host_port>
       </gateway>
       ....
       <gateway>
	   <id> id gateway_N </id>
   	   <name> name gateway_N </name>
   	   ....
      </gateway>
   </gateways>
</result>
Result by entity_type=3 - IVR
Returns N tag ‘ivr’ within the ‘ivrs’tag container.
Each tag ‘ivr’ contains the information fields of the IVR and M tag node within the container tag nodes:
<result>
   <outcome>0</outcome>
   <ivrs>
     <ivr>
       <id> ivr_1 id</id>
	   <name> ivr1_1 name </name>
	   <description> Description ivr_1 </description>
	   <nodes>
	     <node>
   	       <node_id> id node_1 </node_id>
		   <parent_id> id parent node </parent_id>
		   <description> node desc_1 </description>
		   <select_key> entrance key </select_key>
		   <go_back_key> return key </go_back_key>
		   <audio_type> 1 (audio_file) </audio_type>
		   <audio_message> audio node file </audio_message>
		   <audio_loop> 1=continuos ring - 0=una once</audio_loop>
		   <input_type> input type (Appendices\Table 11) </input_type>
		   <input_length> (only for input_type=1) expected input length </input_length>
		   <term_char> (only for input_type=2) character termination input </term_char>
		   <timeout_last_digit> (only for input_type=3) wating time from last digit </timeout_last_digit>
		   <waiting_input_time> max waiting time input </waiting_input_time>
		   <action> Node action (Appendices\Table 12) </action>
		   <called_type> (only for action=2) Type of entity to call -  (Appendices\Table 1) </called_type>
		   <called_id> (only for action=2) ID to call </called_id>
		   <called_external_number> (only for action=2) number to call</called_external_number>
		   <script> (only for action=3) script to run </script>
		   ....
		   ....
		 <node>
		   <node_id> ID nodo_M </node_id>
		   ...
		   ...
		 </node>
	   <nodes>
   	 </ivr>
   	 ...
   	 ...
   	 <ivr>
	   <id> ID ivr N <id>
	   <name> name ivr N </name>
	   ...
	   <nodes>
	     <node>
		   nodo 1.N
		 </node>
		 ....
		 ....
		 <node>
		   nodo M.N
		 </node>
	   </nodes>
   	 </ivr>
   </ivrs>
</result>
Result per entity_type=7 - Terminal
N.B. This command returns the terminals of a specific User therefore it is necessary to specify the parameter ‘owner_id’. Omitting the parameter does not mean obtaining the complete list of terminals but a null list.
Returns N tag ‘device’ within the tag ‘devices’, relating to the User whose ID was specified in the parameter ‘owner_id’.
Each of the ‘gateways’ tags contains the gateway information fields:
<result>
  <outcome>0</outcome>
  <devices>
        <device>
	   	  <id> ID terminale_1 </id>
	   	  <user_agent> user agent of terminal_1 </user_agent>
	   	  <device_type>terminal_1 (Appendices\Table 5) </device_type>
	   	  <host_port> IP and terminal port </host_port>
	   	  <registered> 1/0 - registrato/non_registrato </registered>
        </device>
        ....
	<device>
		  <id> ID device_N </id>
	   	  ....
	   	  ....
	</device>
   </devices>
</result>
Result per entity_type=8 - Casella vocale aziendale
Returns N tag ‘voicemail’ within the tag contenitore 'voicemails’
Each tag ‘voicemail’ contiene i campi informativi della casella vocale aziendale:
<result>
	<voicemails>
	  <voicemail>
	    <id> ID casella vocale  </id>
	    <vmid> ID generale casella vocale aziendale </vmid>
	    <vmname> name casella vocale</vmname>
	    <vmcode> number da chiamare per accedere alla gestione della casella </vmcode>
	    <vmtobelisten>1/0 ci sono/non ci sono nuovi messaggi </vmtobelisten>
	    <rectobelisten>1/0 ci sono/non ci sono nuove registrazioni </rectobelisten>
	  </voicemail>
      .....
	  <voicemail>
	    <id> ID casella vocale  </id>
	    ....
	  </voicemail>
	</voicemails>
</result>
Result per entity_type=11 - Linea parcheggio
Returns N tag ‘park_line’ within the tag ‘lines’ '.
Each ‘park_line’ tag contains the information fields of the parking line:
<result>
  <lines>
    <park_line>
      <id> Parking Line ID  </id>
      <linecode> Code access to the line </linecode>
      <number> number parked </number>
      <name>Name of contact in the address book </name>
      <parktime> parking date time YYYY-MM-DD hh:mm:ss</parktime>
      <status> parking line status (Appendices\Table 2) </status>
      <note> note from the parking user </note>
      <user_id> ID of the parking user<user_id>
    </park_line>
  </lines>
</result>
Service “get_call_report”
Description
The service get_call_report allows you to retrieve the history of calls transited through the phone system, which meet a series of requirements specified by the parameters entered in the request.
Parameters:
- service=get_call_report (required)
- token: (required)identification password
- call_id: (optional) call identification
- date_from: (optional) lower limit for the date of the call history
- if omitted means all calls without a lower date limit
- formed = YYYY-MM-DD hh:mm:ss
- date_to: (optional) upper limit for the date of the call history
- if omitted, it means all calls without an upper date limit
- formed = YYYY-MM-DD hh:mm:ss
- limit: (optional) maximum number of calls returned
- offset: (optional) call number from which to start a new search
- calling_type: (optional) calling entity type (Appendices \ Table 1)
- calling_id: (optional) calling entity id
- calling_number : (optional) calling number
- called_type: (optional) entity type called (Appendices \ Table 1)
- called_id: (optional) called entity id
- called_number: (optional) number called
- outcome: (optional) call outcome (Appendices \ Table 8)
- external_id: (optional) id generated by external application with the call_req_ext command
Result:
<result>
<outcome>0</outcome>
<call>
<id> call identification</id>
<start_time> call start time </start_time>
<duration> duration of the call in seconds </duration>
<outcome> outcome of the call (Appendix \ Table 8) </outcome>
<calling_id> id of the calling entity </calling_id
<calling_type> calling entity type </calling_type>
<calling_number> calling number </calling_number>
<called_id> id of the called entity </called_id>
<called_type> entity type called </called_type>
<called_number> number called </called_number>
<connected_id> id of last connected entity </connected _id>
<connected _type> type of last connected entity </connected _type>
<connected _number> last number connected </connected _number>
<ring_time> ring time in seconds</ring_time>
<hold_time> waiting time in seconds </hold_time>
<ivr_time> time spent in IVR in seconds </ivr_time>
<talk_time> actual conversAction time </talk_time>
<queue_time> time in queue for a group </queue_time>
<call_ref_if> call id of the transferred call
</call_ref_id>
<external_id> iexternal id specified via service call_req_ext </external_id>
<gateway_in> outgoing call from gateway</gateway_in>
<gateway_out>incoming call from gateway</gateway_out>
<internal> call between extensions </internal>
<call>
</result>
Service “get_current_calls”
Description
The service get_current_calls allows you to retrieve calls in progress at the time of the request.
The list of calls in progress will be returned in XML format and each call will be inserted in a tag ‘call’.
Parameters:
- service=get_current_calls (required)
- token: (required) identification password
- call_id: (optional) identification of the only call of interest; omitting this parameter, the list of all calls in progress will be returned.
Result:
<result>
  <outcome>0</outcome>
  <call>
     <id> call identification</id>
     <start_time> call start time </start_time>
     <calling_id> id of the calling entity </calling_id
     <calling_type> calling entity type </calling_type>
     <calling_number> calling number </calling_number>
     <calling_desc> identity of the caller </calling_desc>
     <called_id> id of the called entity </called_id>
     <called_type> entity type called </called_type>
     <called_number> number called </called_number>
     <called_desc> identity of the person called </called_desc>
     <connected_id> id of entity connected </connected _id>
     <connected_type> entity type connected </connected _type>
     <connected_desc> identity of connected </connected_desc>
     <recording> 1/0 in recording</recording>
     <external_id> external id </external_id>
     <p2p> 1/0 peer to peer active </p2p>
     <codec> current codec code </codec>
   <call>
 </result>
Service “add_phonebook”
Description
The service add_phonebook allows the external developer to insert a contact in the centralised directory of the VOIspeed phone system.
If the contact is entered, the identification of the contact is returned in VOIspeed.
In the future it will be possible to delete and / or update the contact using the returned identifier.
Parameters:
- service=add_phonebook (required)
- token: (required) password identification
- name: first name
- surname: surname
- company: company
- office: office number
- home: home number
- mobile: mobile number
- fax: fax number
- other: other number
- email : email address
- publicview: booleano (0/1), set the public visibility of the contact - default 0 (= no). WARNING! to make the contact visible it is necessary to set it to 1.
- publicedit: booleano (0/1), enables the public updating of the contact- default 0 (=no)
- external_contact_id: external id of the contact
Result:
<result>
    <outcome>0</outcome>
    <contact_id> ID del contatto </contact_id>
</result>
Service “update_phonebook”
Description
The service update_phonebook allows the developer to update a contact in the centralised directory of the VOIspeed phone system, identified by the parameter contact_id.
Parameters:
- service=update_phonebook (required)
- token: (required) password of identification
- name: contact name
- contact_id: contact ID to update
- surname: contact surname
- company: company
- office: office number
- home: home number
- mobile: mobile number
- fax: fax number
- other: other number
- email : email address
- publicview: booleano (0/1), sets the public visibility of the contact - default 0 (= no)
- publicedit: booleano (0/1), enables the public updating of the contact - default 0 (=no)
- external_contact_id: external id of the contact
Service “delete_phonebook”
Description
The service delete_phonebook allows the developer to delete a contact in the centralised directory of the VOIspeed phone system, identified by the parametercontact_id.
The command can be used both to delete your own phone system contacts and to delete contacts coming from a synchronisation with an external directory (via the command phonebook_import_sync); in the first case using the command contact_id whilst in the second case, it will be necessary to use the app_name and external_contact_id.
Parameters:
- service=delete_phonebook (required)
- token: (required) identification password
- contact_id: (required - alternative to the copy app_name e external_contact_id) ID of contact to delete
- app_name: (required in copy to external_contact_id - alternative to contact_id) Application owner of the contact to be deleted
- external_contact_id: (required in copy to app_name - alternative to contact_id) Reference ID of the contact to be deleted in the proprietary application
Service “get_phonebook”
Description
The service get_phonebook allows the developer to retrieve a set of contacts that match the search parameter ‘search’. The search will take place in the fields (string) name, surname, company, email, office, home, mobile, fax e other.
The service will return a list of contacts in XML format; each contact is contained in the tag.
Parameters:
- service=get_phonebook (required)
- token: (required) password of identification
- search: (required) value to look for in the various contacts
- limit: (optional) maximum number of directories returned
- offset: contact id to start a new search from
Result:
<contact>
  <name> Name of contact </name>
  <surname> Surname of contact  </surname>
  <company> Company of contact </company>
  <office> Office number  </office>
  <home> Home number </home>
  <mobile> Mobile number </mobile>
  <fax> Fax number </fax>
  <other> Other number </other>
  <email> Email address </email>
  <is_favourite> 1\0 preferred contact or not </is_favourite>
</contact>
Service “call_request_ext”
Description
The service call_request_ext allows the developer to call any entity of the system and, if this accepts the call, to connect it to another entity of the system.
N.B. The first entity called plays the role of ‘calling’ whilst the second entity has the role ‘called’.
The following Figure shows the sequence of actions and extended events that arise from the execution of the command ‘call_request_ext’:
Parameters:
- service=call_request_ext (required)
- token: (required)
IdentAction password
- calling_id: (required) id of the calling entity
- calling_type: (required) type of the calling entity (Appendices\Tabel 1)
- calling_number: (required) number of the calling entity
- calling_timeout: (optional) - default = 60 sec. - maximum waiting time for the answer of the calling entity.
- called_id: (required) id of the called entity
- called_type: (required)type of entity called (Appendices \ Table 1)
- called_number: (required) number of the called entity
- extid: (optional) : external identification, for use by the developer, which will be inserted in the SSN events and in the call reports
- device: (optional) default = first sip terminal - indicates which terminal should be used if the calling entity was a user. Allowed values:
- sip
- mobile
- id of the terminal if you know it
- to_be_rec: (optional) - default = 0 - indicates whether the call should be recorded or not (values 1 \ 0)
- auto_answer: (optional) - default=0 -
- default = 0 - allows you to decide whether or not one of the entities involved in the call should answer automatically. Allowed values: Appendices \ Table 13 - default = 0 - indicates whether the call must be recorded or not.(values 1 \ 0)
- swap_event: (optional) - default=0 - indicates whether the extended events related to the call to the first entity should be exchanged or not.
- swap_event=0
indicates that the event must be raised at the time of the call to the first entity ‘outgoing_call’
- swap_event=1 indicates that:
- no SSN event will be raised at the time of the call to the first entity.
- when the first entity accepts the call, the event will be raised ‘incoming_call’, as if the call had been actively made by the entity itself.
N.B. the parameter auto_answer will be considered only if it refers to a user and if the chosen terminal supports it, otherwise it will be ignored.
Successful result
<result>
  <outcome> 0 </outcome>
  <request_id> request id </request_id>
</result>
Negative result
<result>
  <outcome> 1 </outcome>
  <error> error description </error>
</result>
N.B. the positive result means that the extended call service has been provided but that the VOIspeed PBX has received the request correctly and validated the sender. The service will be provided asynchronously at a later time.
Service “call_transfer_ext”
Description
The service call_transfer_ext (extended call transfer) allows you to replace an entity A connected through a communiction COM_1, with an entity B connected through the communiction COM_2.
The following figure shows the intial situation before running the extended call transfer service:
The following figure shows thefinal situatione after the execution of the extended call transfer service:
The execution of the extended call transfer service takes place via the following sequence of operations:
- termination of the entity_call_A call in communication_1
- transfer of the entity_call_B call from communication_2 to Commutazion_1, effectively replacing entity_call_A
- ending of communication 2 and consequently also termination of the entity_call_D call
Parameters
- service=call_request_ext (required)
- token: (required) password identification
- replace_com_id: (required) ID of the communication (COM_1) in which entity A is present
- replace_type: (required) - entity type A to be replaced in COM_1 communication - Appendices - Table 1
- replace_id: (required) - ID of entity A to be replaced in the COM_1 communication
- replace_call_id: (required) ID of entity A to be replaced in the COM_1 communication - VOIspeed Architecture Section - Figures 1.4 and 1.5)
- recipient_com_id: (required) - ID of the communication COM_2 which contains the entity B intended as the destination entity of the extended transfer..
- recipient_type: (required) type of entity B of destination - Appendices - Table 1
- recipient_id: (required) ID of entity B of destination
- recipient_call_id: (required) entity_call_id of entity B in communication COM_2 - VOIspeed Architecture Section - Figures 1.4 and 1.5)
Service “call_divert_ext”
Description
Suppose we have a communication COM_1 in which entity_A and entity_B are involved, as shown in the following Figure:
The service call_divert_ext (extended call diversion) allows you to replace entity_B with a third entity C.
The following figure shows the final situation after the execution of the service :
The execution of the extended call service diversion involves the following actions:
- ending call entity_call_B
- event notification of the extended event ‘disconnect_out’ relating to entity B
- call to entity C resulting in the creation of entity_call_C
- event notification of the extended event ‘call_out’ relating to entity C
- upon the arrival of a 'call_progress' from C, a synthetic free tone is made to entity_A
- notification of the Event‘call_progress’ relating to entity C
Parameters
- service=call_divert_ext (required)
- token: (required) password identification
- com_id: (required) ID of the communication COM_1 where to perform the extended diversion of the call
- replace_type: (required) - entity type B to be replaced in communication COM_1 - - Appendices - Table 1
- replace_id: (required) - Entity B ID to be replaced in COM_1 communication.
- replace_call_id: (required) entity_call_id of entity B in communication COM_1 - VOIspeed Architecture Section - Figures 1.4 and 1.5)
- recipient_type: (required) - entity type C which will replace entity B in communication COM_1 - Appendices - Table 1
- recipient_id: (required) - Entity ID C
- recipient_number: (optional) number associated with entity C of destination
Service “call_recording_ext”
Description
The service Activate/disactivate the recording of the communication is identified by the Value of the parameter call_id.
Parameters
- service=call_recording_ext (required)
- token: (required) password identification
- call_id: (required) ID of the communication on which to activate/disactivate the recording
- enabled: (required) 1\0 Activate/disactivate recording.
Service “call_terminate”
Description
The service ends the communication resulting in the disconnection of the two entities involved.
Parameters
- service=call_terminate (required)
- token: (required) password identification
- call_id: (required) ID of the communication to end
Extended events
In the chapter Integration tools we have seen how to configure an Integration module, in which you have specified:
- extended events (SSN) of interest to you
- your notification URL
and you have configured everything correctly, when the events you have selected occur, you will receive “Notifications” presso at the URL you have indicated.
Before starting the discussion on events it is appropriate to make an important clarification regarding the "direction" of events
N.B. Extended events, unlike User events that have the User
itself as the object of events, they have as their point of view
events the PBX. The extended Event 'call_in’ means
that a call request from an entity has arrived at the PBX
system, while the Event extended ‘call_out’ means that from
PBX has started a call indication to a system entity.
All System Events (SSN) will always contain the following parameters:
- eventtype: il Value 1indicates that it is aSystem event
- event: Code Event (see Events table)
- event_name: Event name (see Events table)
- token: the token associated with your Integration module if you have enabled the commands, otherwise the value will be null.
- domain: the name of the VOIspeed domain to which the Event refers
- license_id: VOIspeed installation license
- datetime: date time of the Event
- call_id: ID of the communication to which the Event refers
- call_id_ext: any external ID, if it was entered among the service parameters'*call_request_ext*’
- call_status: status of the communication (Appendices - Table 9)
| Event |
Code |
Description |
| call_in |
1 |
Incoming call from entity |
| call_progress |
2 |
Incoming call from entity |
| call_out |
3 |
Call to entity |
| call_response |
4 |
Call response (positive \ negative) from entity |
| disconnect_in |
5 |
call termination sent to entity |
| disconnect_out |
6 |
call termination received from entity |
| call_transfer |
7 |
Call Transferred (Supervised Forwarding) |
| dtmf_out |
8 |
Event obsolete - decommissioned |
| call_divert |
9 |
Call diverted (blind forwarding) |
| call_terminated |
10 |
Call ended |
| call_held |
11 |
Call put on hold by entity |
| call_retrieved |
12 |
Call activated (after waiting) from entity |
Event “call_in”
Code: 1
Description
Notification of the arrival of a call from the number ‘calling’ to number ‘called’ by the entity identified by the coordinates (calling_id, calling_type)
Parameters
- calling: calling number
- calling_id: ID of the calling entity
- calling_type: type of calling entity(Appendices - Table 1)
- called: number called
Event “call_progress”
Code: 2
Description
Notification of the arrival of a call signal from the entity specified by the coordinates(sender_id, sender_type)
Parameters
- sender_id: ID of the entity that sent the call progress signal
- sender_type: type of the entity that sent the call progress signal(Appendices - Table 1)
- progress-code: Call progress queues (Appendices - Table 14)
Event “call_out”
Code: 3
Description
Notifies an outgoing call from the PBX to the entity specified by the coordinates (called_id, called_type) from the ‘calling’ number to the ‘called’number
Parameters
- calling: calling number
- called: number called
- called_id: ID of the entity to which the call was sent
- called_type: type of entity to which the call was sent (Appendices - Table 1)
Event “call_response”
Code: 4
Description
Notification that the entity identified by the coordinates(sender_id, sender_type) sent the final answer to a call sent to it. The parameter ‘outcome’ indicates whether the call was accepted or rejected and if so, the outcome.
Only in the case of an accepted call (OK outcome), a series of parameters follow that notify the current "actors" in the call: the coordinates of the entities are notified ‘calling’, ‘called’ e ‘connected’.
N.B. In every call, in addition to the entities ‘calling’ e ‘called’, the entity connected remains.
The connected entity can coincide with one of the two calling and called entities if they are simple entities, or not coincide if one of the two is a composite entity.
For example, if the called entity is a Ring Group, the connected entity is the User of the group that accepted the call.
Parameters
- sender_id: ID of the entity that sent the call response signal
- sender_type: type of the entity that sent the call response signal (Appendices - Table 1)
- outcome: outcome of the call response - (Appendices - Table 8)
- calling_id: Entity ID ‘calling’ when the call is answered
- calling_type: type of entity ‘calling’ when the call is answered (Appendices - Table 1)
- calling_local_id: this is the entity_call_id relating to the entity ‘calling’
- called_id: Entity ID ‘called’ when the call is answeredli>
- called_type: type of entity ‘called’ when the call is answered(Appendices - Table 1)
- called_local_id: this is the entity_call_id relating to the entity ‘called’
- connected_id: Entity ID ‘connected’
- connected_type: type of entity ‘connected’ when the call is answered (Appendices - Table 1)
- reject-code: only in case of failure - SIP call rejection code (Appendices - Table 14)
Event “disconnect_in”
Code: 5
Description
Notifies the PBX of a termination signal called by the entity identified by the coordinates(sender_id, sender_type).
Parameters
- sender_id: ID of the entity that sent the called termination signal
- sender_type: type of the entity that sent the called termination signal (Appendices - Table 1)
Event “disconnect_out”
Code: 5
Description
PBX notification by the PBX of a termination signal called to the entity identified by the coordinates (recipient_id, recipient_type).
Parameters
- recipient_id: ID of the destination entity of the called termination signal.
- recipient_type: type of the destination entity of the called termination signal. (Appendices- Table 1)
Event “call_transfer”
Code: 7
Description
Notify a call transfer from the coordinate entity (sender_id, sender_type) of the communication 'call_id', to the entity (recipient_id, recipient_type) of the communication ‘refer_id’.
N.B. At the end of the transfer, the 'recipient' entity will be included in the communication of the transferring entity instead
of the transferring entity itself. The communication 'refer_id' will come
ended.
Parameters
- call_id: ID of the communication to which the transferring entity belongs
- sender_id: ID of the transferring entity
- sender_type: type of transferring entity(Appendices - Table 1)
- refer_id: ID of the communication where the recipient of the transfer resides
- recipient_id: ID of the entity receiving the transfer
- recipient_type: type of the transfer destination entity(Appendices - Table 1)
Event “call_divert”
Code: 9
Description
Notify the call diversion from the entity (sender_id, sender_type) of the communication 'call_id', to the entity (recipient_id, recipient_type) of communication.
N.B. At the end of the diversion, the entity ‘recipient’ will be inserted in the communication instead of the entity ‘sender’.
The entity of destination ‘recipient’ is in the ringing’status.
Parameters
- call_id: ID of the communication to which the transferring entity belongs.
- sender_id: ID of the sending entity, which will be replaced by the recipient entity.
- sender_type: type of the sending entity (Appendices - Table 1)
- recipient_id: ID of the ‘recipient’entity to the call diversion; will take place of the sending entity ‘sender’
- recipient_type: type of destination entity (Appendices - Table 1)
Event “call_terminated”
Code: 10
Description
Notifies the termination of the communication identified by the parameter ‘call_id’. the parameter ‘outcome’ defines the final outcome of the call.
Parameters
Event “call_held”
Code: 11
Description
Notification of the 'waiting' of the call by the User specified by the parameter ‘user_id’; the entity type is implied (User).
Parameters
- user_id:ID of the User who put the call on hold
- user_call_id: id of the user call (entity_call_id) put on hold.
Event “call_retrieved”
Code: 12
Description
Notifies the recovery of the call from waiting by the User specified by the parameter ‘user_id’; the entity type is implied (User).
Parameters
- user_id: The user id that reactivated the call
- user_call_id: reactivated id of the user call (entity_call_id).
Example: Predictive dialer
In this section we will describe which services and which events to use to implement a simple predictive dialer.
A predictive dialer is a software that takes N numbers from a database, calls them all simultaneoususly and for each accepted call tries to put the interlocutor in communication with a free operator.
N.B. In this example we will not write Code, but we will request
the execution of certain services through our browser,
retrieving the parameters to be attached to requests from a simple
text file event logger.
Step 1 - Enable extended commands and events (SSN)
- Edit the Integration module you created earlier
- Enable the commands and make a note of the “token” assigned to you
- Enable all SSN events
- Disable all User events (for simplicity).
- Enter the URL of your WEB server in the URL for notifications so that it points to the script “logger.php” (see "Event Logger" In the chapter "Integration Tools")
Step 2 - Configuration IVR reception
The first step is to create and configure a new auto responder to which external numbers can be connected when they accept the call.
- Create a new IVR and call it ‘Reception’
- Edit the IVR you just created and make a note of its ID in the "General Information" section.
- Create a root node of the IVR and configure it as follows:
- select a node message that plays a background noise or any other welcome message.
- Set “Loop audio message” a “SI”
- Set "Input type" to "Not required"
- Set "Node action" to "None"
Step 3 - Configuration IVR hold-operator
Create and configure a new auto responder to connect operators to “available” waiting connecting them with an external number.
- Create a new IVR and call it ‘Operator waiting’
- Edit the IVR you just created and make a note of its ID in the "General Information" section.
- Create a root node of the IVR and configure it as follows:
- Select a node message that plays a message indicating to the operator that it is about to be connected with an external number.
- Set “Loop audio message” to “YES”
- Set "Input type" to "Not required"
- Set "Action of the node" to "None"
Step 4 - Gateway search available
We shall use the service “get_entities” to obtain the list of gateways and evaluate the number of free lines.
Open the browser and launch the following URL using the URL associated with your domain and thetoken of your Integration module.
SERI_URL?service=get_entities&entity_type=2&token=my_token
… and you will get your company's gateway list.
In our example, choose a gateway with free lines and take note of its ID, in the general case, however, for each gateway you should save the ID and the number of free lines.
N.B.
In this example we will call a single external number and connect it with a single User; however the operation can be
automated and scaled to number of external numbers..
Step 5 - Search for numbers to call
Search your contact database for all those still to be called in a number equal to the number of free lines you recovered in Step 4.
In our example, the number will only be one and choose it in such a way that it exists and is reachable.
Step 6 - User search Available
Also in this case, as in Step 4, we will use The service “get_entities” selecting the type“User”
SERI_URL?service=get_entities&entity_type=0&token=my_token
… and you will get the list of users of your company.
In our example you choose an “Available” User for the call (av_status=2) - see Appendices Table 2) and take note of its ID which we will call "user_id".
In the general case, choose an M number of "available" users and memorise the User ID for each.
Step 8 - Launch calls to external numbers
We launch the call to external number chosen in Step 5 using the “gateway” selected in Step 4 and connect it to’IVR “Reception” using the “call_request_ext” service as follows:
SERI_URL?service=call_request_ext&token=MY_TOKEN
&calling_id=ID_GATEWAY&calling_type=2
&calling_number=number_EXTERNAL
&called_id=ID_IVR_reception
&called_type=3
&called_number=YOUR_number_COMPANY
&extid=YOUR_CALL_IDENTIFIER
N.B. the parameter “extid” it will be inserted in all SSN events related to this call; you can use this Value, on your own
generated, to associate each call Event received with the relative
“call_request_ext” which generated the call itself.
In the general case, ie in the case in which we have developed a software of "predictive dialing", we should launch as many calls with the service "call_request_ext" as there are free lines of the Gateways (Step 4).
Step 9 - Launch calls to operators
Immediately after launching the call to the external number (Step 8), we launch a call to the operator chosen in Step 6. Also in this case we use the service “call_request_ext” to connect the operator chosen to the’IVR "Waiting-operator" configured in Step 3.
SERI_URL?service=call_request_ext&token=MY_TOKEN
&calling_id=ID_OPERATOR&calling_type=0
&calling_number=number_EXTERNAL
&called_id=ID_IVR_WAIT_OPERATOR
&called_type=3
&called_number=extension_OPERATOR
&extid=YOUR_CALL_ID
&auto_answer=1
N.B. the parameter “auto_answer” set to 1 indicates that the "calling" entity, ie the chosen operator, is required to
automatic reply, if your terminal supports it.
It is advisable to use the automatic reply to shorten the connection times between theoperator chosen and the IVR "Waiting-operator".
With steps 8 and 9 we launched two calls:
- la prima communication COM_1 per connettere un external number con l’IVR reception with communication ID ID_COM_1.
- the second communication to connect theoperatore with the IVR Waiting-operator con ID communication ID_COM_2.
At this point we just have to wait for the SSN events that derive from the two calls in question and retrieve the data we need from the “logger” of the events referred to in Step 1.
For the first call we will receive the events:
- 1.A - call_out (Code: 3) or call to the gateway chosen
- 1.B - call_response (Code = 4) or call accepted by the external number
- 1.C - call_out (Code: 3) call to the IVRreception
- 1.D - call_response (Code = 4) call accepted by the IVR reception
For the second call we will receive the events:
- 2.A - call_out (Code: 3) i.e. call to operator chosen
- 2.B - call_response (Code = 4) i.e. call accepted by the operator
- 2.C - call_out (Code: 3) call to the IVR Waiting-operator
- 2.D - call_response (Code = 4) call accepted by the IVR Waiting-operator
Step 10 - "external number" - operator interconnection
The final goal is to have a single communication that interconnects the external number with the operator and simultaneoususly disconnects the two IVRs that we used as "support".
The service “call_transfer_ext” makes our case; in fact, it allows us to replace the IVR reception in COM_1 communication with the COM_2 communication operator.
To do this you need to open the “logger” events and take note of the following data:
- ID_COM_1 extracted from the parameter “call_id” from any of the events of the first communication (1.A - 1.B - 1.C - 1.D).
- ID_COM_2 extracted from the parameter “call_id” from any of the events of the second communication (2.A - 2.B - 2.C - 2.D).
- IVR_CALL_ID extracted from the parameter “called_local_id” of Event 1.D.
- OPERATOR_CALL_ID extracted from the parameter “calling_local_id” of the Event 2.B.
We will also call:
- IVR_ID the ID of the IVR reception of communication com_1
- OPERATOR_ID l’ID of the operator(User)
Finally, from Appendices - Table 1, we know that:
- USER_TYPE = 0
- GATEWAY_TYPE = 2
- IVR_TYPE = 3
Now format the command “call_transfer_ext” as follows:
SERI_URL?service=call_transfer_ext&token=MY_TOKEN
&replace_com_id=ID_COM_1
&replace_type=IVR_TYPE
&replace_id=IVR_ID
&replace_local_id=IVR_CALL_ID
&recipient_com_id=ID_COM_2
&recipient_type=USER_TYPE
&recipient_id=OPERATOR_ID
&recipient_call_id=OPERATOR_CALL_ID
… and launch it in your browser.
If you have not made any mistakes you should note that the external number is connected with the operator in the COM_1 communication and that the COM_2 communication is ended.
Integration IVR
In this chapter we will discuss another very powerful and flexible type of Integration with the VOIspeed phone system. We are talking about the Integration on the automatic responder or IVR side
Introduction
VOIspeed allows you to create an IVR tree whose nodes, after having played an audio message and having received any input from the User, can run an external script indicating in the parameters
information relating to the number connected, to the communication ID, the nodo explored to the input received by the User via DTMF.
Furthermore, the executed script, using a certain syntax that we will describe later, can return the sender IVR new actions to perform like transit to a child node, forward the call to a number or system entity or change some or all of the properties of the current node and run it again.
Configuration Integration IVR
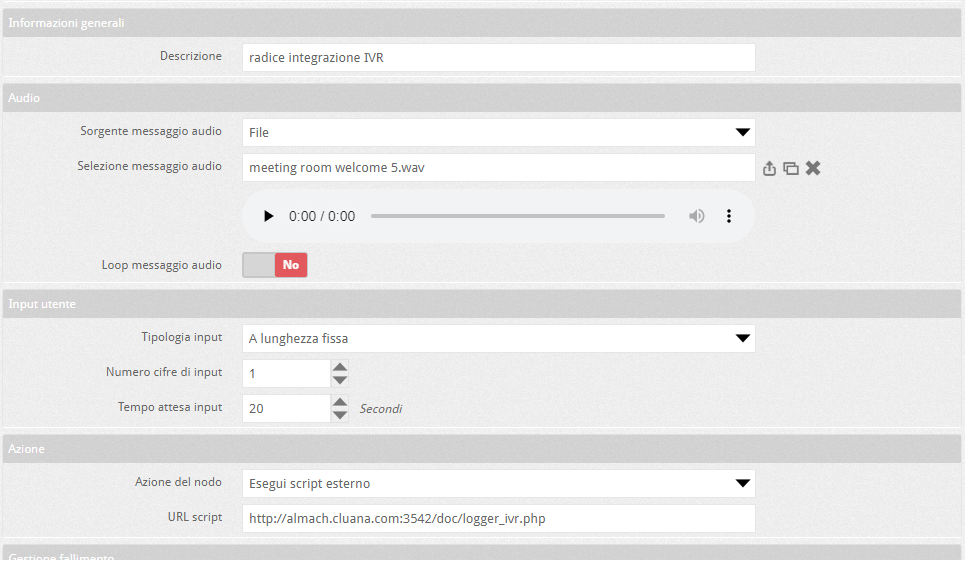
Before starting the in-depth discussion, let's see how to configure an IVR with only one root node running an external script.
- Enter “Configuration\Responders”
- Create a new IVR and call it “Test Integration IVR”
- Create a root node and call it “Root test Integration”
- Select a short audio messsage to send to play in mode “NO LOOP”
- Set “Input type” a "Fixed length"
- Set "Number of input digits = 1"
- Set “Action of the node” to "Follow script"
- In the field “URL script” insert “server_web_url/logger_ivr.php”
IVR event logger
In this section we will implement a simple IVR event logger.
On your web server, edit the file “logger_ivr.php” and enter the following Code:
<?php
	$file_handle = fopen('logger_ivr.txt','a');
	$tmp_time = date(DATE_RSS);
	$tmp_query = $_SERVER['QUERY_STRING'];
	fwrite($file_handle,$tmp_time.' '.$tmp_query."\r\n");
	fclose($file_handle);
	return TRUE;
?>
Create a routing rule for the number 12345 and associate it with the IVR“Test Integration IVR” that you created in the previous Step. Now take a registered terminal of the extension “35” and call the number “12345”.
If you have done all of the above correctly, you should hear the audio message you have selected for the node “Integration test root”. When playing the message or at the end of it press key “1” of the terminal that you are using.
Now go to your web server and open the "logger_ivr.txt" file and you will find the following line containing the “querystring” related to the script invoked by the node “Integration test root”:
license_id=MP3026487718&domain=almach1.it&ivrid=9&nodeid=0
&callid=10724&calling=35&called=12345&input=1&tag=-1
Let's examine the “querystring” received in more detail:
- license_id: license for your VOIspeed installation
- domain: domain related to your VOIspeed installation
- ivrid: ID of the IVR sender “Test Integration IVR”
- nodeid: ID of the sender node “Root test Integration”
- callid: ID of the switch hosting the IVR call
- calling: number connected to the IVR
- called: number called by “calling” to connect to the IVR
- input: DTMF sequence entered by “calling”
- tag: state variable at your disposal, whose current Value is inserted in all scripts invoked by the node, and can be updated by you when you return from the script itself.
You will surely have noticed that after a few seconds, the call closed automatically, before understanding why, it is important to underline that:
N.B. Each time an IVR node runs a script, it notifies you of information relating to the but, more importantly, to
rentry of the script means it is waiting for your indications of Action
to complete.
S
If you omit to enter the instructions, or you have entered them syntactically incorrectly, thedefault action or call termination.
This explains the automatic closing of our test call, in fact the "logger_ivr.php" script, after having "logged in" the Event returns TRUE and no instructions.
Return script instructions
When the script returns, the sender IVR node performs an analysis of your response to extract the Action to be performed, therefore, before analysing in detail how many and which actions can be defined, we give some syntactic rules to send well-formed instructions.
-
The script must return a sequence of lines of text separated by character “CRLF” (Carriage Return Line Feeder)
-
Each line of text must contain the name of a parameter and its Value separated by the character “=” (es: parameter=Value)
-
The name of the parameter and its Value is "case insentive"that is, it does not matter whether you write it in uppercase or lowercase or both.
-
The first line must contain the COMMAND parameter which specifies the action to be performed (Appendices - Table 15).
 command=Action
 parameter_1=Value_1
 parameter_2=Value_2
 ....
 parameter_N=Value_N
Each action has its own particular parameters that allow its execution.
Action “End call”
Code: 0
Description
This action ends the current call and is the default action in the event that no instructions are received or if the instructions are poorly formed.
PHP example:
<?php
	$file_handle = fopen('logger_ivr.txt','a');
	$tmp_time = date(DATE_RSS);
	$tmp_query = $_SERVER['QUERY_STRING'];
	fwrite($file_handle,$tmp_time.' '.$tmp_query."\r\n");
	fclose($file_handle);

	return 'command=0';
?>
Output script:
command=0
Action “Transit to next node”
Code: 1
Description
This action tells the current node to transit to its child node with the selection key specified by the parameter “node_key”.
If there is no child node with the specified selection key, it remains in the current node until the call is closed by the interlocutor.
Parameters
- node_key: entry key of the sub-node in which you must transit.
PHP example:
<?php
	$file_handle = fopen('logger_ivr.txt','a');
	$tmp_time = date(DATE_RSS);
	$tmp_query = $_SERVER['QUERY_STRING'];
	fwrite($file_handle,$tmp_time.' '.$tmp_query."\r\n");
	fclose($file_handle);

	$tmp_command = 'command=1';
	$tmp_key = 'node_key=2';

	return $tmp_command."\r\n".$tmp_key;
?>
Output script:
command=1
node_key=2
Action “Transfer to number”
Code: 2
Description
This Action instructs the current node to transfer the call to the number specified by the parameter “recipient_number”.
Parameters
- recipient_number: number to which the call is to be transferred.
N.B. The entity to which the call will actually be transferred will result from the analysis of the routing rules configured in the
PBX using the number as a search parameter.
“recipient_number”
PHP example:
<?php
	$file_handle = fopen('logger_ivr.txt','a');
	$tmp_time = date(DATE_RSS);
	$tmp_query = $_SERVER['QUERY_STRING'];
	fwrite($file_handle,$tmp_time.' '.$tmp_query."\r\n");
	fclose($file_handle);

	$tmp_command = 'command=2';
	$tmp_number = 'recipient_number=385';

	return $tmp_command."\r\n".$tmp_number;
?>
Output script:
command=2
recipient_number=385
Action “Transfer us to entity”
Code: 3
Description
This action tells the current node to transfer the call from a system entity by specifying its coordinates through parameters “recipient_id” and “recipient_type” using as number called the number specified by the parameter “recipient_number”.
In the following example, suppose you want to transfer the call to Assistance Group” with ID=“5” by notifying them of the company number called for example "073333655434"
Parameters:
- recipient_id: ID of the destination entity
- recipient_type: type of destination entity (Appendices - Table 1)
- recipient_number: number to be used as the number called when connecting with the destination entity.
Remember that the Code that identifies the group is 1.
PHP example:
<?php
	$file_handle = fopen('logger_ivr.txt','a');
	$tmp_time = date(DATE_RSS);
	$tmp_query = $_SERVER['QUERY_STRING'];
	fwrite($file_handle,$tmp_time.' '.$tmp_query."\r\n");
	fclose($file_handle);

	$tmp_cmd = 'command=3'."\r\n";
	$tmp_nr = 'recipient_number=073333655434'."\r\n";
	$tmp_id = 'recipient_id=5'."\r\n";
	$tmp_type = 'recipient_type=1';

	return $tmp_cmd.$tmp_nr.$tmp_id.$tmp_type;
?>
Output script:
command=3
recipient_number=073333655434
recipient_id=5
recipient_type=1
Action “Update and follow node”
Code: 4
Description
This action tells the current node to update its internal properties with the contents of the returned parameters and launch the new execution.
The action “Update and run node” is perhaps the most powerful and flexible Integration tool. It allows the integrator,
on the front of a single node configured on the VOIspeed side, to execute routing logics completely detached from the internal configuration of the PBX by assigning:
Parameters
- audio_message: path of the new message to play in the current node.
- audio_loop: indicates play mode:
- “audio_loop=1” play new message on continuous loop
- “audio_loop=0” play new message once
- input_type: indicates the new input mode (Appendices - Table 11)
- input_timeout: indicates how long the new input must wait before the "on failure" Action is triggered
- input_length: new length expected for the input (only for input_type = 1).
- termination_char: new end-of-input character (only for input_type = 2).
- last_digit_timeout: new value for the timeout from last digit (only for input_type = 3).
- back_key: return new key to previous node
- node_action: the new action to be performed by the node (Appendices - Table 12)
- called_id: ID of the entity to which to transfer the call (only for "node_action = 2")
- called_type: type of entity to transfer the call to (only for "node_action = 2")
- called_number: number with which to call the entity to which to transfer the call (only for "node_action = 2")
- node_tag: new external tag to be applied to the node that will come to the integrator as a parameter of the next script executed (only if "node_action = 3")
- script_url: url of the script to run (only if "node_action = 3")
- failure_called_id: ID of the entity to which to transfer the call in case the requested input does not arrive within the expected time
- failure_called_type: type of entity to which to transfer the call in case the requested input does not arrive within the expected time
- recipient_auto_answer: indicates whether the recipient of the call transfer should answer automatically or not.
PHP example
<?php
	$file_handle = fopen('logger_ivr.txt','a');
	$tmp_time = date(DATE_RSS);
	$tmp_query = $_SERVER['QUERY_STRING'];
	fwrite($file_handle,$tmp_time.' '.$tmp_query."\r\n");
	fclose($file_handle);

	$tmp_cmd = 'command=4'."\r\n";
	$tmp_msg = 'audio_message=new_message.wav'."\r\n";
	$tmp_loop = 'audio_loop=0'."\r\n";
	$tmp_len = 'input_length=6'."\r\n";
	$tmp_timeout = 'input_timeout=10'."\r\n";
	$tmp_action = 'node_action=3'."\r\n";
	$tmp_script = 'script_url=new_url'."\r\n";
	$tmp_tag = 'tag=5';

	return $tmp_cmd.$tmp_msg .$tmp_loop .$tmp_len.$tmp_timeout.
	       $tmp_action.$tmp_script.$tmp_tag;
?>
Output script:
command=4
audio_message=new_messagge
audio_loop=0
input_length=6
input_timeout=30
node_action=3
script_url='new_url'
tag=5
Upon re-entry of the script, the current node will know that it:
- will have to play the message only once “new_message”
- will have to wait for maximum of “30 seconds” an input of “6 figures”
- received such figures will have to invoke the script“new_script”
- to which script will have to attach the parameter "tag = 5" (it could be an integrator status variable to see where it is, in its finite state machine when it receives the script from the node.
Example: PIN control on entry
Suppose a company provides an advanced telephone technical support service, which can be accessed by calling a specific number “support_number”.
Suppose, furthermore, that this company provides all customers, who have subscribed and paid for an annual subscription,with a 6-digit PIN through which to access the service.
In this example we will see how to implement automatic PIN control via Integration on the IVR side.
Step 1 - create group "Group_support"
- Create a group and call it “Group support”
- Set ringmode to “simultaneous”
- Insert 2\3 users in group that have at least have at least one registered terminal.
Step 2 - create "IVR_Support" tree
- Create a new responder "IVR_Support"
- to its extension insert a root node “Support_root” with the following properties:
- a welcome audio message, which invites the User to enter their PIN
- set audio_loop = NO
- set input_type to "fixed length"
- set the length to "6"
- set the timeout to 10 seconds
- set the node Action to "run_script"
- set the script to run to “script_support.php”
- set the action on failure to "Transfer call to" and choose a User prepared to receive "unauthenticated" calls.
- Create a sub node “Wrong_PIN” from the node “Support_root” with the following properties:
- set the selection key to "1"
- set an error message that notifies the imminent transfer to the default operator
- set “audio_loop=NO”
- set input type to "none"
- the Action of the node to "transfer to User" and choose the User
- Create a sub node “PIN_ok” of the node “Support_root” with the following properties:
- set lthe selection key to "2"
- set an audio message notifying the correctness of the PIN and the imminent transfer to the technical support service..
- set “audio_loop=NO”
- set input type to “none”
- set the action from the node to “Transfer to Group” and choose the “Support_Group”
Step 3 - Routing
Create a new routing rule “Support_Rule” which connects all incoming calls for the number “Support_number” to the auto responder “IVR_Support”
Step 4 - Implement action verification script
Suppose for simplicity that the only 6-digit PIN allowed in
our little example is “123456” while all the other sequences
are wrong. In a real application, the company certainly has a DB whose extension there is a Table where you can verify the authenticity of the PIN entered.
Create the file “script_support.php” open it and insert the following Code:
<?php
	$tmp_cmd = "command=1"."\r\n";
	if ($_GET["input"] == "123456"){
    	$tmp_key = "node_key=2";
    }
	else {
    	$tmp_key = "node_key=1";
	}
	return $tmp_cmd.$tmp_key;
?>
Analysing the script, we can see that the Return Action is always“Transit to the next node”, however, if the sequence is correct, the selection key is set to“2” or the node “success”, if instead the sequence is wrong, the selection key is set to “1” or the node "failed"
Copy your script to your web server and from a third-party User terminal, call the number “support_number”.
If you have done the configurations correctly your call will be connected to the node “Root_support” of the responder“IVR_support”.You will be asked to enter a 6-digit PIN; type it correctly ie “123456”; at this point you should hear the node message “PIN_OK” and immediately afterwards your call will be transferred to the group “Group_Support”.
If you repeat the operation by mistaking the required sequence, you should pass through the node “PIN_Error” and immediately afterwards the call will be transferred to the default User.
Synchronisation of Contacts Directory
Introduction
The service phonebook_import_sync allows the external developer to import and / or massively synchronize a set of contacts within the centralised address book of the VOIspeed PBX.
An important aspect in the management of this command is the possibility to tag the contacts imported into VOIspeed from an external application with a uc_app_name. This identifier can be assigned to a User so that the UI, by logging in with this identifier, will use it as a preference when choosing the resolution of the contact on call.
Uc_app_name parameter management
As indicated in the Introduction, the parameter uc_app_name
(which will be described in detail later in the manual) has an important meaning also in the management of the name-number resolution carried out by the VOIspeed system during the call phase.
When VOIspeed manages a call with a given external number it tries to solve it with the contact data within its own address book; since with the introduction of the service uc_app_name the contacts can also be entered in VOIspeed by third-party applications, the user may be interested in giving a resolution priority in order to resolve potentially controversial situations if, for example, the same number is in the address book is associated to different names ..
For this, in the Configuration of the Integration Module (already seen in the section Integration tools) there is a special section where you can specify:
- Enabling the module to synchronise the address book;
- The address book synchronisation tag.

After configuring this aspect, in the User profile it will be possible to select your application created for the synchronisation of contacts in the address book as the preferred name / number resolution application in call.

Service parameters
- service: (required) phonebook_import_sync
- token: (required) password identification
- verbose_output: [optional] 1 / 0 activate/disactivate extended output
This service must necessarily be invoked via the http POST method, the body must contain a single named parameter“contacts” and enhanced with the contacts to be imported / synchronized in JSON format. The request body must be coded according to the standard multipart/form-data.
The single contact is an object with the following attributes:
- name: contact name
- surname: contact surname
- company: company
- numoffice: office number
- numhome: home number
- nummobile: mobile number
- numsms: sms number
- nummobil2: other mobile number
- numfax: fax number
- numother: other number
- email: email address
- uc_app_name: name of the third-party application from which the contact comes
- external_contact_id: (required) contact identifier for the third-party application
- ext_info: additional contact information
Example of the POST body:
contacts:[{"name":"Gustavo",
	   "surname":"Fring",
           "company":"Los Pollos Hermanos",
	   "numoffice":"0733123123",
	   "numhome":"0733456456",
	   "nummobile":"3339876543",
	   "numsms":"3339876543",
	   "nummobil2":"3339876543",
	   "numfax":"0733998877",
	   "numother":"0254739399",
	   "email":"gustavofring@yahoo.com",
	   "uc_app_name":"HBO",
	   "uc_external_id":"contact-1",
	   "ext_info":"..."},
	  {"name":"Walter",
	   "surname":"White",
	   "company":"Car Washing Inc.",
	   "numoffice":"555123123",
	   "numhome":"555456456",
	   "nummobile":"5559876543",
	   "numsms":"5559876543",
	   "nummobil2":"5559876543",
	   "numfax":"555998877",
	   "numother":"55554739399",
	   "email":"walterwhite@yahoo.com",
	   "uc_app_name":"HBO",
	   "uc_external_id":"contact-2",
	   "ext_info":"..."},
	  {"name":"Saul",
	   "surname":"Goodman",
	   "company":"Goodman Law",
	   "numoffice":"06123123",
	   "numhome":"06456456",
	   "nummobile":"069876543",
	   "numsms":"069876543",
	   "nummobil2":"069876543",
	   "numfax":"06998877",
	   "numother":"0654739399",
	   "email":"saulgoodman@yahoo.com",
	   "uc_app_name":"HBO",
	   "uc_external_id":"contact-3",
	   "ext_info":"..."}]
The parameters that represented telephone numbers admit strings formed exclusively by numeric characters, at most prefixed with the "+". Any other characters such as letters, spaces, commas or special characters, are eliminated (sanitized).
the parameter ext_info
allows you to attach additional information, typical of third-party applications, to the contact. This information is intended as data of interest to the User, in order to better manage contacts during the call.
For example, if the contact is a customer of the company, the information could be the customer's turnover, credit, invoices paid, unpaid, etc. These data can subsequently be used, during the call phase, displayed within the User interface (UI VOIspeed).
In order for these to be correctly received they must respect a certain format. In particular, they must be encoded in JSON format and must be a collection of objects, each of which has two fields / attributes: ‘caption’ and ‘value’,
which respectively represent the name or title of information and the information itself. Here is an example of the parameter valorisation ext_info with which to link additional information to a contact:
"ext_info":[{"caption":"Sale",
	     "value":"1000 EUR"},
	    {"caption":"Credit limit",
	     "value":"2000 EUR"},
	    {"caption":"Sales Agent",
	     "value":"Mark Smith"},
	     ....
	     ....
	    {"caption":"Shipping address",
	     "value":"26 London Road"}]
Service result
The result of the service differs based on the choice of the extended output parameter(verbose_output).
Base:
In the case of basic output, the xml returned is the following:
<result>
    <outcome>0</outcome>
    <processed>N contacts processed by the service </processed>
	<skipped>N contacts skipped because they are invalid</skipped>
	<warnings>N contacts imported but which generated an alert</warnings>
	<errors>N contacts not imported due to server errors</errors>
</result>
Contacts can be skipped for several reasons:
- one or more mandatory parameters are not specified;
- all three fieldsname, surname e company are empty;
- all fields representing telephone numbers are empty (after the cleaning process);
- the parameter uc_app_name s not valid (this parameter is considered valid when it falls within one of the values allowed among the Integration VOIspeed modules enabled to upload contacts to the address book, for further information see phone system documentation)
The contacts produce an output warning when:
- one or more fields contain inadmissable characters.
Extended:
In the case of extended output, the xml returned, in addition to basic information, includes an exhaustive report with all the information relating to the individual contact.
<result>
<outcome>0</outcome>
<processed>N contacts processed by the service </processed>
<skipped>N contacts skipped because they are invalid</skipped>
<warnings>N contacts imported but which generated an alert</warnings>
<errors>N contacts not imported due to server errors</errors>
<contacts>
<contact>
<uc_external_id>contact identifier for the third party application</uc_external_id>
<id>VOIspeed contact identifier</id>
<act>Action performed during the contact processing (insert / update)</act>
<info>any error or warning message</info>
</contact>
...
...
...
<contact>
<uc_external_id>contact identifier for the third party application</uc_external_id>
<id>VOIspeed contact identifier</id>
<act>Action performed during the contact processing (insert / update)</act>
<info>any error or warning message</info>
</contact>
</contacts>
</result>
The tag <act> allows you to understand which action was carried out on the particular contact, i.e. the insertion of a new element or the updating of an existing element.
The algorithm underlying this behavior is based on two coordinates, represented by the parameters uc_app_name e external_contact_id.
If no contact matching the Value of these two parameters is found in the VOIspeed address book, a new contact is added ( insert );
otherwise, if a contact with these coordinates already exists, it is not duplicated, but overwritten ( update ).
This approach allows you to perform a massive synchronisation of the address book repeated over time, avoiding duplication of the contacts in the external application.
Appendices
Table 1
| Value |
Entity type |
| 0 |
User |
| 1 |
Ring Group |
| 2 |
Gateway |
| 3 |
IVR automatic responder |
| 7 |
Terminal |
| 8 |
Company Voicemail |
| 10 |
Meeting Room |
| 11 |
Parked lines |
| 13 |
Department |
Table 2
| Value |
Audio video status |
| 0 |
Unknown |
| 1 |
Unavailable |
| 2 |
Available |
| 3 |
Ringing |
| 4 |
Busy |
| 5 |
Do not Disturb DND |
| 6 |
Reserved |
| 7 |
Absent |
| 8 |
In diversion |
Table 3
| Value |
Gateway type |
| 0 |
VoIP Carrrier |
| 1 |
ISDN Line |
| 2 |
GSM network |
|
| 3 |
Analogue Line |
Table 4
| Value |
Gateway status |
| 1 |
Not registered |
| 2 |
Registered |
| 7 |
Recording attempt |
Table 5
| Value |
Terminal type |
| 0 |
Unknown |
| 1 |
Reserved |
| 2 |
SIP terminal |
| 3 |
USB terminal |
| 4 |
DECT terminal |
| 5 |
Mobile terminal |
Table 6
| Value |
User Events |
| 1 |
Command failed |
| 8 |
Incoming call to the User |
| 9 |
Call made by the User |
| 10 |
New voice message for the User |
| 12 |
New missed call for the User |
| 14 |
Call in conversation |
| 15 |
Call rejected |
| 16 |
Call ended by the user |
| 17 |
Termination call received |
| 18 |
Call transferred |
Table 7
| Value |
User call status |
| 0 |
Unknown |
| 1 |
Outgoing connection |
| 2 |
Active |
| 3 |
In Attesa |
| 4 |
Ended |
| 5 |
Inbound connection |
Table 8
| Value |
Call outcomes |
| 0 |
Unknown |
| 1 |
OK |
| 2 |
Number called Busy |
| 3 |
Rejected by number called |
| 4 |
Number called unavailable |
| 5 |
Number called does not answer |
| 6 |
There are no lines available for connection to the number called |
| 7 |
Number called in do not disturb (only if extension) |
| 8 |
Number called Absent (only if extension) |
| 9 |
Calling number does not answer |
| 10 |
Calling number busy |
| 11 |
Rejected by calling number |
| 12 |
Number called unavailable |
| 13 |
There are no lines available to connect to the calling number |
Table 9
| Value |
Communication status |
| 0 |
Inactive |
| 1 |
Incoming call from calling entity |
| 2 |
In connection with called entity |
| 3 |
Active |
| 4 |
In diversion to another entity or number |
| 5 |
Being taken by a User |
| 6 |
Called extension not available |
| 7 |
Finishing |
| 8 |
Ended |
Table 10
| Value |
Group ring mode |
| 1 |
Simultaneous ring |
| 2 |
Cyclic ring |
| 3 |
Cyclic ring with forwarding |
| 4 |
Progressive ring |
| 5 |
Progressive ring with forwarding |
| 6 |
Not used |
| 7 |
Automatic queuing |
Table 11
| Value |
IVR node input type |
| 0 |
No input expected |
| 1 |
Input a fixed length |
| 2 |
Character terminated input |
| 3 |
Input with timeout from last received digit |
Table 12
| Value |
IVR node actions |
| 0 |
No Action |
| 1 |
Transition to the next node |
| 2 |
Make call |
| 3 |
Run external script |
Table 13
| Value |
Automatic reply |
| 0 |
No automatic reply |
| 1 |
The caller answers automatically |
| 2 |
The called party answers automatically |
Table 14
| Forwarding code |
Description |
| 180 |
Called Ringing |
| 181 |
Call forwarded |
| 183 |
Generic call forwarding |
Table 15
| Value |
Return action from IVR script |
| 0 |
End call |
| 1 |
Transit to the next node |
| 2 |
Transfer call to number |
| 3 |
Transfer call to an entity |
| 4 |
Rerun the node with the new properties |